
OKX · Bot Parameters
OKX Spot Martingale Settings and Worst-Case Cost
OKX's spot Martingale bot does three things. It buys an initial order; as price moves down, it adds safety orders at the steps you set, pulling your average holding cost lower; and once price bounces to the take-profit level, it sells everything bought in that round in one go. Its biggest trap is built into the same logic: if the market keeps sliding in one direction, the safety orders get used up one after another, all your money is in and price is still falling, and the only choices left are to hold on or to stop out. With the parameters from the official example on the help page, filling all 4 safety orders takes 3,100 USDT in total, 31 times the first order.
Don't let the name mislead you. The help page shortens it to DCA, but it isn't dollar-cost averaging on a calendar (that's Recurring Buy, covered in How to Use the OKX DCA Bot: Hand DCA Over to a Program). It adds an order each time price drops another step.
How the spot Martingale bot works: one cycle from initial order to take-profit
The help page defines a trading cycle as one trade's journey from buying to selling, and says every cycle has at least an initial order and a take-profit order. The simplest case is a single buy that rises to the take-profit price and gets sold, with no safety orders along the way.
Safety orders only come into play when price falls. In the T0 (initial orders placed) part of the help-page example, the trigger prices for safety orders #1 through #4 are all listed right after the initial order: whichever level price touches is the one that fills. With each fill you hold more coins, your average holding cost goes down, and the take-profit price is recalculated. The take-profit formula is:
Take-profit price = average holding cost for the current cycle × (1 + take-profit target per cycle)
Here is that formula at work in the official example: with only the initial order the average holding cost is 20,000 USDT and the take-profit price is 22,000 USDT. After price dips briefly to 15,000 and three safety orders fill in a row, the help page gives an average holding cost of 16,512.10 USDT, and the take-profit price drops to 18,163.31 USDT. Price no longer has to get back to the original 20,000; a bounce to 18,163.31 is enough to sell the whole round. The price you pay is that the money in this round has gone from 100 USDT to 1,500 USDT (100 + 200 + 400 + 800).
The stop-loss is a separate line altogether. Per the help page, stop-loss price = initial order fill price × (1 − stop-loss percentage), and once the stop-loss price is triggered and fully filled, the bot ends. Its base is the initial order fill price, not the average holding cost, so however many safety orders fill, the stop-loss price doesn't move down with them.
What each setting controls, and what happens if you raise or lower it
The official example uses 7 parameters: a 5.00% drop before each safety order, a 10.00% take-profit target per cycle, a 100 USDT initial order, a 200 USDT safety order, a maximum of 4 safety orders, a 1.5× price step multiplier and a 2.0× amount multiplier, plus a stop-loss. The labels in the app may be worded a little differently; the table below goes by what each one does. The easiest way to remember them is in two groups: one decides how deep a drop you can ride out, the other how much money you need to have ready, and the maximum number of safety orders belongs to both.
| Setting | What it controls | Raise it | Lower it |
|---|---|---|---|
| Drop before a safety order | How far safety order #1 sits below the initial price; also the base for every later gap | Safety orders come later, and the drop the whole set covers gets deeper in proportion | Safety orders come sooner and closer together, the covered drop shrinks in proportion, and you run out of them faster |
| Price step multiplier | How much the gap widens with each step down | The lower levels spread further apart; with 4 orders at 2.0× the set covers 75% | At 1.0× the steps are evenly spaced, and 4 orders cover only 20% |
| Safety order amount | How much safety order #1 buys | Every safety order grows in proportion, and so does the safety-order part of your total outlay | The safety-order part shrinks in proportion |
| Amount multiplier | How much the order size is multiplied by with each step down | Your cost comes down faster, and total outlay rises even faster; at 2.0×, 4 orders total 3,100 USDT | At 1.0× every order is the same size, 4 orders total 900 USDT, and your cost comes down slowly |
| Max safety orders | How many safety orders one cycle can add at most | You can ride out a deeper drop, but with an amount multiplier above 1 the extra order is the heaviest one of all | Less money needed, but you're fully loaded sooner, with nothing in reserve |
| Take-profit target per cycle | How far above the average holding cost it sells | More banked each round, but it takes a bigger bounce to trigger | Triggers more easily, less banked each round |
| Stop-loss percentage | How far below the initial order fill price the bot ends | Leaves room for safety orders, but loses more when it does trigger | Ends earlier, possibly stopping out before the last few safety orders have filled |
| Initial order amount | How much the initial order buys | Starting position and total outlay both grow | Starting position and total outlay both shrink |
The 20%, 75%, 900 and 3,100 in the table come from changing one multiplier at a time; the method is in the next section.
The two multipliers are worth working out on their own. With the amount multiplier at 1.0, 1.5 and 2.0, filling all 4 safety orders takes 900, 1,725 and 3,100 USDT in total: going from 1.5 to 2.0 adds 1,375 USDT. With the price step multiplier at 1.0, 1.5 and 2.0, the 4 orders cover drops of 20%, 40.625% and 75%. The first governs your wallet, the second your depth. Turn both up and the bot looks able to absorb a very deep drop, on the condition that you can actually come up with those last few large orders.
The official example, recalculated: price and size of each of the 4 safety orders
Start with how trigger prices are worked out. The help page gives safety order #2 as a trigger price of 20,000 × (1 − 5% − 5% × 1.5) = 17,500 USDT. The formula in the official example shows that every trigger price uses the initial order fill price as its base and stacks the gaps downward from there; it doesn't take the previous order's fill price and discount it again. The gap for level k is 5% × 1.5^(k−1), and its size is 200 × 2^(k−1).
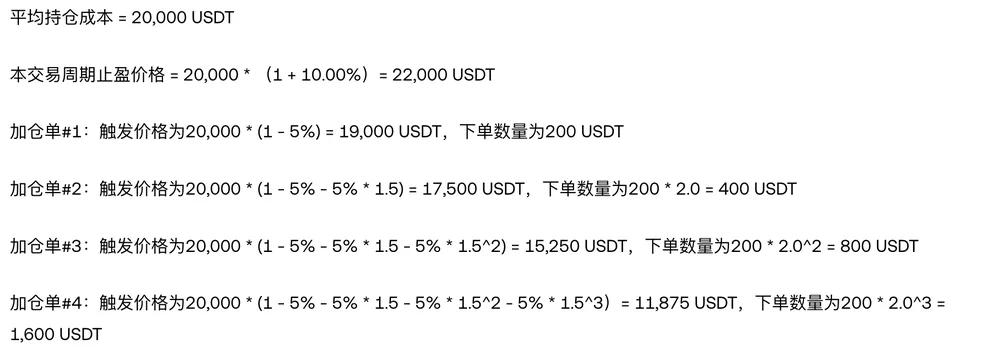
| Order | Trigger price formula | Trigger price (USDT) | Order size (USDT) | BTC bought | Total in | Average holding cost | Take-profit price |
|---|---|---|---|---|---|---|---|
| Initial order | — | 20,000 | 100 | 0.005 | 100 | 20,000 | 22,000 |
| Safety order #1 | 20,000 × (1 − 5%) | 19,000 | 200 | ≈0.01053 | 300 | ≈19,322 | ≈21,254 |
| Safety order #2 | 20,000 × (1 − 5% − 7.5%) | 17,500 | 400 | ≈0.02286 | 700 | ≈18,237 | ≈20,061 |
| Safety order #3 | 20,000 × (1 − 5% − 7.5% − 11.25%) | 15,250 | 800 | ≈0.05246 | 1,500 | 16,512.10 | 18,163.31 |
| Safety order #4 | 20,000 × (1 − 5% − 7.5% − 11.25% − 16.875%) | 11,875 | 1,600 | ≈0.13474 | 3,100 | ≈13,742 | ≈15,117 |
What's official and what's calculated: the trigger prices, the order sizes, and the average cost and take-profit price in the initial-order and #3 rows are all on the help page. The cells marked “≈” and the running total are worked out from the same set of parameters: average holding cost = total put in ÷ total BTC, take-profit price = that × 1.1, rounded, with fees left out. Anyone can redo the numbers from the parameters on the help page.
The T1 part of the help page also has a line calculating the amount of quote currency held, and it doesn't match the per-order amounts on the same page. This article goes by adding up the orders one by one: 1,500 USDT in once the first three have filled, 3,100 USDT once all four have.
Two things in this table matter most. First, after #2 fills the take-profit price is about 20,061, so a return to roughly the starting price is enough to exit; that's where the first two orders are “cheap.” Second, the 1,600 USDT in #4 is more than half of the total outlay, and its trigger price is already 40% below the starting price. What decides whether this set of parameters holds up is that last order.
How much money you need at most, and what happens below the last safety order
Filling every safety order in one cycle takes:
Total outlay = initial order amount + safety order amount × (1 + m + m² + … + m^(n−1))
m is the amount multiplier and n is the maximum number of safety orders. Plugging in the official example: 100 + 200 × (1 + 2 + 4 + 8) = 3,100 USDT. The same parameters give you a few more numbers:
- Multiples. 3,100 USDT is 31 times the 100 USDT initial order; the last safety order, 1,600 USDT, is 16 times the initial order.
- Drop covered. 5% × (1 + 1.5 + 2.25 + 3.375) = 40.625%, which puts the last level at 20,000 × (1 − 40.625%) = 11,875 USDT.
- Once everything has filled. You hold about 0.22558 BTC at an average holding cost of about 3,100 ÷ 0.22558 ≈ 13,742 USDT, with a take-profit price of about 13,742 × 1.1 ≈ 15,117 USDT. Price has to bounce about 27% from 11,875 (15,117 ÷ 11,875 ≈ 1.273) before it takes profit.
The worst case for this set of parameters is: price falls 40% from 20,000, all 3,100 USDT goes in, and then it has to climb back nearly 30% before you can get out.
Below 11,875, all 4 safety orders are used up and no new ones are placed. From there it goes one of two ways:
- No stop-loss set. The bot keeps holding about 0.22558 BTC and waits for a bounce to about 15,117. If price falls to 10,000, the position is worth about 2,256 USDT, an unrealized loss of about 844 USDT, roughly 27% of the 3,100 put in.
- Stop-loss set. Once the stop-loss price is triggered and fully filled, the bot ends and the loss becomes real. Because the stop-loss price is based on the initial order fill price, whether it sits above or below the last safety order matters a lot. Two illustrative settings: with a 30% stop-loss, the stop price is 20,000 × 0.7 = 14,000, between #3 and #4, so the 1,600 in #4 never gets its turn; at most 1,500 goes in before you're out, and filling at 14,000 loses roughly 228 USDT. With a 45% stop-loss, the stop price is 11,000, below the last level, so all four safety orders can fill, and filling at 11,000 loses roughly 619 USDT.
This closely resembles a grid breaking below the bottom of its range: the bot stops adding orders, the position is still there, and every further drop is yours to carry. For the grid side of that story, see OKX Grid Bot Stopped? First Work Out Which Kind of Stop It Is.
On the money side, the help page says three more things worth knowing. First, once the bot is created, the funds committed to it are ring-fenced from your trading account, and the page reminds you to watch for liquidation risk on positions caused by changes in the trading account's assets. That money is no longer in your trading account, so if you have other positions there, don't count it as available margin. Second, you can create at most 50 spot Martingale bots; run several at once and your worst case is the sum of all their total outlays. Third, whether the platform moves the money for every level into the bot at creation isn't spelled out in the help-page example; go by the investment amount shown on the creation screen. Whatever it moves, have enough set aside yourself according to the formula above.
AI strategy or manual setup, plus how the spot and futures versions differ
In the OKX app, go to Trade → Trading Bots and choose the Spot DCA (Martingale) bot. The help page describes two modes. In the AI strategy mode, the platform recommends strategy cards with different styles and parameters based on the coin's past price action; you pick a card, enter the investment amount and the bot is created. In manual mode, you fill in the trigger conditions, the investment amount and the other parameters yourself. Older tutorials describe a smart-creation option split into conservative, balanced and aggressive presets; the help page now calls it the AI strategy mode.
An AI card saves effort, but it's based on the coin's past price action, and past price action doesn't repeat (see A Beautiful Backtest That Loses Money Live: The Five Most Common Reasons). The careful approach is to copy the parameters off the card and run them through the formulas in the previous section to get three numbers: total outlay, the price of the last safety order, and the take-profit price once everything has filled. If any one of the three is more than you can live with, pick another card or switch to manual.
In manual mode, filling things in this order is less likely to go wrong than working down the form from top to bottom:
- Decide the most you're willing to put into one round, then use the total outlay formula to work back to the safety order amount and the amount multiplier.
- Use the drop before each safety order and the price step multiplier to work out where the last level sits, and ask yourself whether you've seen this coin fall that far before.
- Decide whether the stop-loss goes above or below the last safety order, and work out the maximum loss for both cases.
- Work out how big a bounce you'd need to take profit once everything has filled, and only then choose the take-profit target per cycle.
One more point has nothing to do with parameters: the help page says that if the asset runs into an unforeseeable abnormal situation such as a trading halt or delisting while the bot is running, the bot stops automatically. Factor that in before setting up a bot on a thinly traded coin.
The futures version carries a different kind of risk. It's explained in OKX's help article on the futures Martingale bot (the version updated 14 September 2026):
| Compared | Spot Martingale | Futures Martingale |
|---|---|---|
| Where it is | Trade → Trading Bots, spot version | Trade → Trading Bots, futures version |
| Direction | The example buys in steps as price falls and sells at the take-profit price | The help page says it can go long or short, and can use leverage to add to the position several times when the direction is wrong |
| Liquidation | Bot funds are ring-fenced from the trading account; the help page's warning is about liquidation risk on positions from changes in other assets in the trading account | The help page says liquidation is triggered once the position's maintenance margin ratio is at or below 100% |
| Worst case | With the example parameters, at most 3,100 USDT per cycle, and the loss comes from the holding falling in value | The help page warns that if the price keeps falling, doubling down can magnify the risk of loss without limit, and a forced close once funds run out can mean a heavy loss |
The futures help page adds that high leverage can amplify gains when the market moves your way, but speeds up losses if it turns. Our piece Can You Do Quant Trading Without Coding? lists martingale-style averaging down as high risk, and the numbers above are the reason.
FAQ
If I set enough safety orders, is a Martingale bot guaranteed to make money?
No. OKX's help page states plainly that the Martingale strategy is not a capital-protected strategy. More layers (a higher maximum number of safety orders) let the bot ride out a deeper drop, but when the amount multiplier is above 1, the money you need grows even faster: working from the official example's parameters, 4 safety orders cover a 40.625% drop and need 3,100 USDT, 31 times the initial order. Once price breaks below the last safety order, nothing more is bought; if you've set a stop-loss, the bot ends once it triggers and fully fills, and the loss becomes real.
Can the OKX spot Martingale bot lose money?
Yes. The risk note on the help page says the Martingale strategy is not capital-protected and can still lose money in an extreme one-way decline. Working from the official example's parameters, once all four safety orders have filled the average holding cost is about 13,742 USDT; if price keeps falling to 10,000 USDT, the unrealized loss is about 844 USDT, roughly 27% of the 3,100 USDT put in, and it becomes a realized loss if the stop-loss triggers. The bot also stops automatically if the asset runs into something abnormal such as a trading halt or a delisting.
What's the difference between spot Martingale and futures Martingale?
They are separate bots: both sit in the trading bots section, one as the spot version and one as the futures version. The futures help page says the futures Martingale can go long or short and can use leverage to add to a position several times when the direction is wrong, and that liquidation is triggered once the position's maintenance margin ratio falls to 100% or below. The spot example buys in steps as price falls and sells at the take-profit price, and the money you commit is ring-fenced from your trading account. The futures version adds a layer of leverage and liquidation, so losses arrive faster when the market turns against you.
Are Martingale safety order prices based on the previous order or on the first one?
On the first one, as the formula in OKX's help-page example shows. Safety order #2 is calculated as 20,000 × (1 − 5% − 5% × 1.5) = 17,500 USDT: 20,000 is the fill price of the initial order, and each step's gap is stacked downward from there. In the same example, #3 and #4 sit at 15,250 and 11,875 USDT. The stop-loss uses the initial order's fill price as its base too: stop-loss price = initial order fill price × (1 − stop-loss percentage).
Still torn between a grid and a Martingale? A grid keeps placing orders back and forth inside a range; a Martingale adds orders as price falls and sells the whole round on a single bounce. They suit different market conditions. For how to set the grid's parameters, see How to Set Up an OKX Grid Bot: Parameters, Range, and a One-Week Worked Example.